Asphalt shingle roof replacement is a major project that most people will undertake during the duration of their homeownership. The asphalt shingle roof replacement process involves multiple steps that require careful planning to ensure lasting protection for your home. Understanding when replacement becomes necessary and what a residential roofing installation entails helps homeowners plan this substantial investment.
Wisconsin’s harsh weather conditions place exceptional stress on roofing systems, making proper replacement techniques essential for long-term durability. The comprehensive process begins with shingle removal and disposal, followed by thorough roof decking inspection and repair to address any underlying structural issues. The underlayment installation process creates a crucial moisture barrier before new shingles are installed.
Successful roof replacement projects depend on proper timing and preparation. The weather in Wisconsin can be unpredictable, making advanced planning critical for roofing projects. Whether homeowners choose to tackle portions themselves or rely entirely on professional installation, understanding each phase helps ensure quality results. Professional expertise is especially valuable with complex installations or when structural repairs are needed that exceed DIY skills. Knowledge of the process empowers homeowners to oversee their project effectively and recognize quality workmanship throughout each installation phase.
Before the Work Begins: Choosing the Right Roofing Contractor for Your Project
Selecting qualified contractors requires thorough vetting to ensure a successful residential roof installation. Questions should cover licensing verification, insurance coverage, and specific experience with asphalt shingle roof replacement projects. Contractors should provide current licensing documentation and proof of liability insurance before beginning any work. Experience with local building codes and permit requirements demonstrates professional competency in the field.
Contractors should readily explain their shingle removal and disposal methods, roof decking inspection and repair procedures, and underlayment installation process. Request detailed timelines for project completion and ask about material warranties versus workmanship guarantees. Established contractors maintain relationships with material suppliers and can provide manufacturer warranty information for different shingle types.
Several warning signs show which contractors homeowners should avoid during the selection process. Door-to-door solicitors following storms often lack licensing or use high-pressure sales tactics. Contractors requesting full payment upfront or offering prices significantly below market rates may compromise quality or disappear mid-project. Absence of local references, unwillingness to provide written estimates, or inability to show current insurance certificates should be serious concerns.
An estimate should include detailed breakdowns of materials, labor, and disposal costs. Compare similar scope items across multiple bids rather than focusing solely on total price. Quality roofing contractor selection tips emphasize checking recent customer references and verifying completed projects in your area.
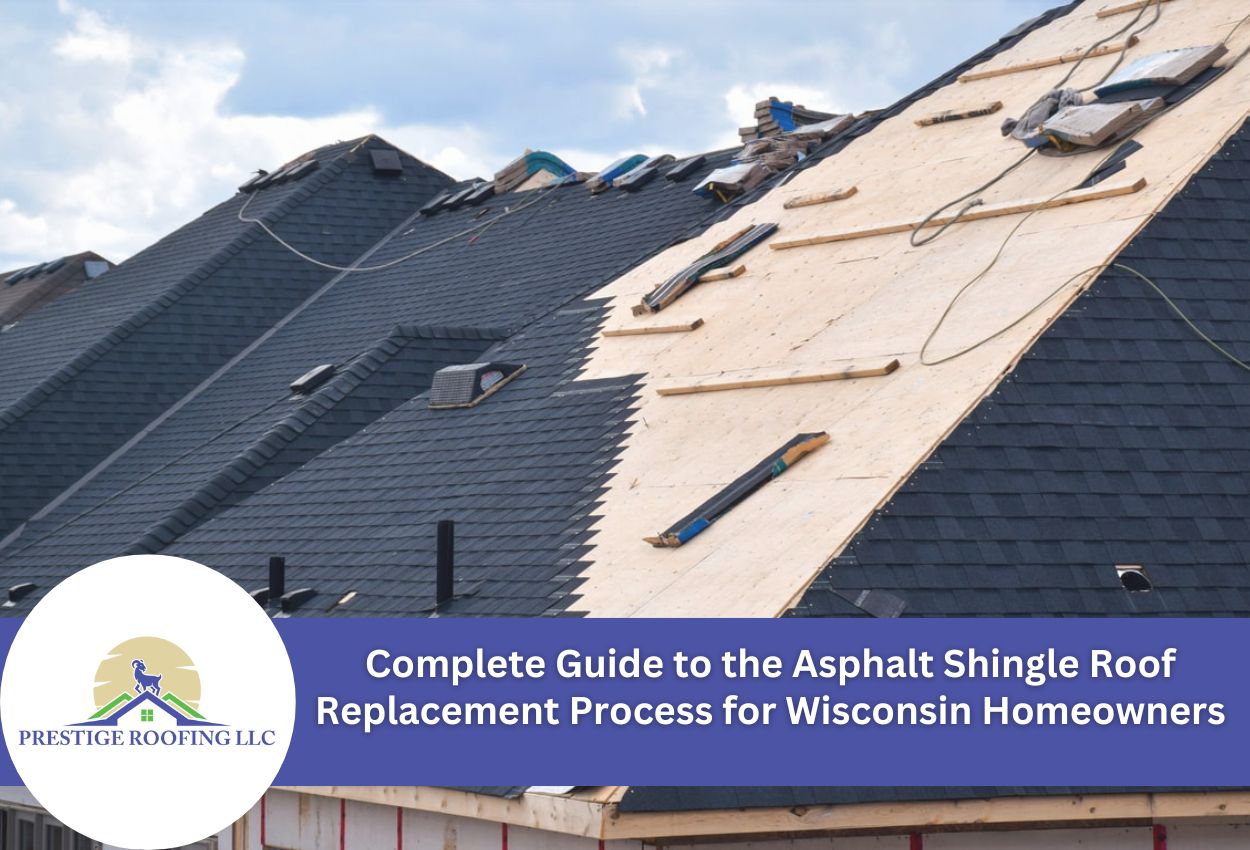
Step #1: Remove Old Shingles and Disposal
Professional shingle removal and disposal begin with establishing safety protocols and protecting surrounding property. Contractors set up tarps around the home’s perimeter to catch falling debris and protect landscaping from damage. Removing the old shingles always starts at the ridge and works downward in manageable sections. Workers use specialized tools like roofing shovels and pry bars to efficiently strip away old materials while preserving the underlying roof deck and structure.
The residential roofing installation steps include careful inspection during removal to identify damaged decking areas requiring repair. Contractors examine each section for signs of water damage, rot, or structural weakness that could compromise the new installation. Nails and fasteners are removed completely to create a smooth surface for the underlayment installation process. This prevents future problems and ensures the new materials adhere completely to the deck.
Environmental responsibility also plays a role in modern roof replacement projects. Many roofing contractors work with recycling centers that process old asphalt shingles into road construction materials. These recycling programs help divert waste from landfills while reducing the project’s environmental impact. Wisconsin has several disposal options, including designated construction waste facilities that accept roofing materials.
Planning the disposal prevents delays in the asphalt shingle roof replacement process. Contractors coordinate dumpster delivery and removal schedules to maintain clean work areas throughout the project. This organized approach means work proceeds efficiently while meeting local waste management regulations and environmental standards.
Step #2: Assess and Repair Your Roof Deck
Professional roof decking inspection and repair are an important part of the asphalt shingle roof replacement process. Qualified contractors examine each decking board after shingle removal and disposal to identify structural deficiencies that could compromise the new roofing system. This thorough assessment includes checking for water damage, wood rot, sagging areas, and improper fastening that may have developed over the years of exposure to Wisconsin’s weather.
Experienced professionals use moisture meters and visual inspection techniques to detect compromised decking materials. Damaged boards exhibit telltale signs, including dark staining, soft spots, visible mold growth, or separation between wood fibers. Contractors probe suspect areas with awls or screwdrivers to test the wood’s integrity. Areas showing structural weakness require complete board replacement before installing the underlayment.
Decking repairs create the solid foundation needed for successful asphalt shingle roof replacement. Contractors replace damaged sections with appropriately sized materials and secure them according to building code requirements, establishing stable surfaces for subsequent installation phases.
Green Bay homes frequently experience decking problems related to ice dam damage, inadequate ventilation, and aging plywood. Coastal moisture can accelerate wood decay in vulnerable areas around chimneys, valleys, and eave edges where water accumulation occurs. Addressing these structural issues during the initial inspection phase prevents callbacks and ensures proper warranty coverage for the completed installation.
Step #3: Install Protective Underlayment and Moisture Barriers
Protective underlayment creates the primary defense against water infiltration during the asphalt shingle roof replacement process. Wisconsin’s sometimes extreme weather means high-performance materials that withstand temperature fluctuations, heavy snow, and ice dams are non-negotiable. Synthetic underlayment materials have superior durability compared to traditional felt options, providing enhanced tear resistance and extended exposure periods during installation delays.
The underlayment installation process begins at the eaves with starter courses that extend beyond the drip edge to direct water away from fascia boards. Contractors roll materials horizontally across the roof deck, following overlap recommendations specified by manufacturer guidelines. Each subsequent row overlaps the previous section to create continuous moisture protection. Professional installation includes fastening using cap nails or staples spaced according to wind zone requirements.
Extra attention should be paid to roof penetrations and valley areas where water concentration occurs. Contractors cut precise openings around vent pipes, chimneys, and other protrusions, then seal these areas with specialized flashing materials. Valley installations typically require additional underlayment layers extending beyond the valley centerline to handle increased water flow during heavy precipitation.
Quality underlayment installation prevents common failure points that lead to interior water damage. The shingle removal and disposal phase often reveals previous underlayment deficiencies, emphasizing the importance of proper installation techniques. Professional contractors understand the local climate and select appropriate materials for long-term performance.
Step #4: New Asphalt Shingle Installation Process
Professional asphalt shingle installation begins at the lowest point of the roof with precise alignment to ensure straight rows throughout the entire roof. Contractors use chalk lines to guide the first course, creating reference points for consistent spacing. All residential roofing installations require careful attention to manufacturer specifications for nail placement.
Working systematically upward, installers overlap each shingle course according to shingle guidelines provided by the manufacturer. Proper fastening generally requires four to six nails per shingle, driven flush with the surface without overdriving, which could compromise weather resistance. Wind uplift resistance depends on correct nail placement through both the current course and the underlying shingle layer.
Complex areas around roof penetrations need specific installation techniques. Vents require careful cutting and sealing with appropriate flashing materials that integrate seamlessly with the shingle courses. Chimney areas involve step flashing installation that weaves between shingle layers, creating weatherproof barriers against water infiltration.
Ridge and hip installations complete the asphalt shingle roof replacement process with specially designed cap shingles that provide weather protection across roof peaks. These final elements require precise cutting and alignment to maintain consistent reveal distances while ensuring adequate overlap for weather resistance. Professional installation techniques guarantee long-lasting performance that withstands Wisconsin’s challenging climate year after year.
Step #5: Final Inspection and Cleanup
The final phase of the asphalt shingle roof replacement process involves comprehensive quality control checkpoints that professional contractors perform to verify proper installation standards. Experienced roofing professionals systematically examine each completed section, checking nail placement, shingle alignment, and exposure consistency throughout the entire installation. This thorough review includes verifying that all residential roofing installation steps were executed according to manufacturer specifications and local building codes.
Contractors inspect critical areas where problems commonly develop, including valleys, ridge lines, and roof penetrations around chimneys or vents. The quality control process examines flashing installations, sealant applications, and overlap techniques that ensure long-term weather resistance. Any deficiencies discovered during this inspection receive immediate attention before project completion. Professional installers also make sure that gutters are aligned and undamaged following the shingle removal and disposal.
Property cleanup represents the final phase of professional roofing services, transforming work areas back to their original condition. Contractors use magnetic sweepers to collect loose nails and metal debris that could damage vehicle tires or pose safety hazards. Landscaping areas receive thorough cleaning to remove shingle granules and construction materials. Professional teams dispose of protective tarps and complete final waste removal according to environmental regulations.
Homeowners should expect their property to be restored to pre-construction cleanliness levels upon project completion. Quality roofing contractors take pride in leaving job sites spotless, reflecting their professional standards throughout the roof decking inspection and repair process and all subsequent installation phases.
Schedule Your Asphalt Shingle Roof Replacement with Prestige Roofing LLC
If you’re considering an asphalt shingle roof replacement in Wisconsin, it’s crucial to choose a contractor you can trust. Prestige Roofing LLC has the expertise and local experience to ensure your project is handled professionally. From selecting the right shingles to final inspection, our thorough process guarantees your home is protected against the elements. Secure your roof by calling Prestige Roofing LLC today at (920) 791-0414 and ensure your roof replacement is done right the first time.